Floral Wreath

posted in: Floral Wreath | 0

PictureThis is a beautiful wreath outside my front door.  What and eye catcher!!  It is not only beautiful, but so simple to make.  This is a craft that will take you an hour to complete.  


Supplies
1 straw wreath
Floral picks in different sizes and colors
Coordinating ribbon
Floral Pins
Scissors


Instructions
Cover the straw wreath with ribbon.  Use a floral push pin to secure the ends into the wreath.  
Start with the inside and work out with the floral picks.  I used a small flower to go around the middle part of the straw wreath, then I used carnations for the middle, then smaller airy flower around the largest part of the wreath.  **Straw wreaths come in many sizes.  You will need the amount of flowers to cover your wreath.  I used a 10″ wreath here and I used approximately 10 small flowers, 15 carnations and 40 smaller airy flowers around the largest part.
Use the scissors to poke holes through the ribbon so you can push the flowers into the wreath.  
Regardless of what type of flowers you use, you will need to cover the entire wreath.  Once it is covered you can add a large or small bow.  I have a small one here because the wreath is so colorful.  If you are using only one type of flower, you will need a more colorful and a larger bow.  


Stamped Wood Tray

posted in: Stamped Wood Tray | 0
Picture
These stamped wood trays are super easy to make.  One large stamp, some gold paint and you are done.  Around the holidays, I like to give these trays with a couple of mugs, hot cocoa and a book. 
Supplies

Wood Tray
Stamp(s)
Stamp Pad(s)
Optional – Embellishments
Acrylic Paint
Varnish
Paint Brush
Optional – Paint Markers

Instructions

1.  Paint the tray.   (Any craft store will have a wide variety of acrylic paint to choose from.  You can also go to your home improvement store and buy samples of water-based paint to use.  The advantage of purchasing the paint this way is that you can customize the color you want.  The store clerk can tint the paint for you)  Once you have painted the tray, let it dry completely before moving on to the next step. 

2.  Pick out the stamps that you will use to decorate your tray.  My suggestion is that you experiment on a piece of paper to see how much ink is needed to achieve your desired effect.  Also, if you are using more than one color, you have to let each color dry completely before starting another one.  Remember, the bigger the stamp the more ink you need, and in return, if you have small, intricate lines, you will need less ink.  

*This is where you can use markers.  If you are using a stamp with lots of detail, you can color the lines of the stamp with markers, then stamp your tray.  Once the lines have all dried, you can color in between the lines with paint or markers.

3.  When you are completely finished with the paint, let the tray dry overnight.

4.  Now its time to varnish.  Since there are so many products on the market, I always recommend to check the manufactures directions and follow them.

5.  If you are going to embellish your tray by gluing on jewels, buttons or ribbon, now is the time to do it.  

*Embellishments – Depending on the style of your tray, you may want to add a bow, jewels, mosaic tiles or any small trinket around the edge.  If the tray is solely for decoration, you can glue the embellishment intend to use it as a tray, you need to keep the main surface flat. 


Gifts

posted in: Gifts | 0

The Garden Pole

posted in: Garden Pole | 0

Picture

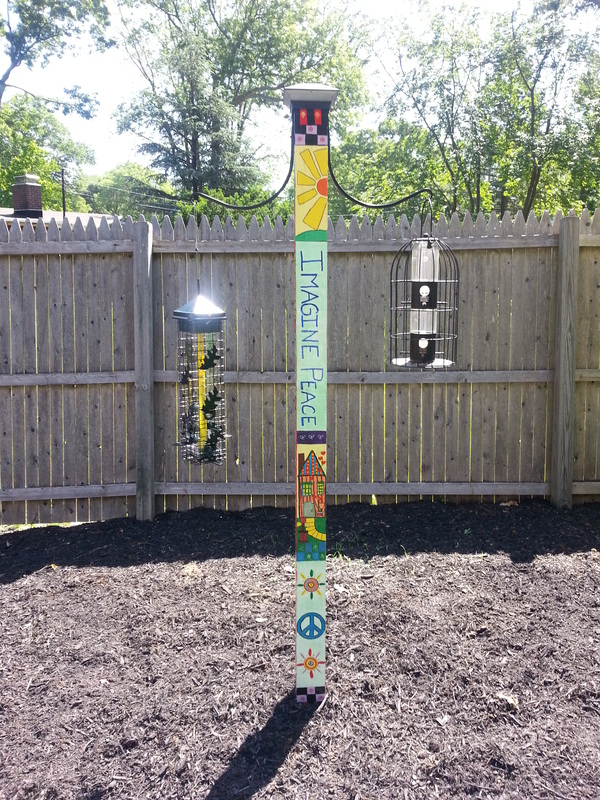
The Garden Pole

This was one of those really enjoyable projects. It did take me almost a month to complete, but it was well worth it.
When I first thought to make a garden pole, I looked on Pinterest and searched the internet for different poles and how they were used.  What I saw was that basically,  anything goes.  Some had wrap around designs while others had simple stripes and polka dots.  I also saw some with lots of different bird houses attached all over the pole.  I immediately fell in love with the garden pole.  I found the idea of painting freehand very intimidating at first, but once I got started, and I realized that it didn’t have to be perfect, the creativity started to flow.  What I quickly learned is that, if I painted something that I really hated, I could wipe it off or just paint over it.  The paint over did happen several times, but I ended up with something I really love and looks great in the garden.      I have bird feeders on it now, but I do alternate between hanging plants and lanterns.                         


My Garden

posted in: My Garden | 0

Picture

My flower gardens really flourished this year.  Everything is in full bloom and gorgeous.  
The butterfly bushes are attracting the most beautiful butterflies.  This one comes back to visit with us every year.  My granddaughter Angelina loves the butterflies as much as I do.  Every time she sees this guy she tries to have him sit on her hand.  Once in a while he indulges her.  

As far as my vegetable garden goes, I didn’t get the outcome that I expected.  My herbs did fantastic.  I have plenty of herbs to cook with as well as freeze, which is great for me.

My strawberries were also very good.  I don’t have the harvest that I would like,
but it doubled from last year, so I am thinking it will continue on that
course.  
My tomato plants gave me plenty of tomatoes, but something infected the plants and the leaves are not healthy.  As a matter of fact, they look like they are definitely dying.  Ugh.  Thankfully, this happened after the tomatoes all sprouted, so they did grow to size and ripen.  I still have lots of green ones on the plants, and it looks like they will ripen like all the rest.  They are delicious.  My husband and I have enjoyed several tomato salads and used them for our sandwiches.  Deeelish!!

Picture

Take a look at this hydrangea plant.  this is the lacecap variety.  I planted this 3 years ago.  It was about 2 feet tall when I put it in and now it is almost 6 feet tall.  The flowers last all summer.  Everyone that comes in my yard comments on this plant.

Picture

Begonias are one of those staple summer plants. They always look great regardless of what color I plant.  They don’t require every day watering.  Which is great!!!  Sun, Shade…it doesn’t matter.  This is the perfect plant for me.


Picture

Tomato Plant – May

Picture

Tomato Plant – July